Coding Flatironically

Learning web development at the Flatiron School

Sending Gmail Emails With Rails

As part of our meetup project, I needed to figure out how to send email via Rails. Our website allows a user to select a favorite photo and then receive a link to that photo via email.

Rails sends email through something called the Action Mailer. The Rails Guides explain how to set up Action Mailer, but I needed to take some additional steps that the documentation didn’t include. For instance, the guide explains how to send a welcome email after a user signs up, but we wanted to send an email later on - after the user selects a favorite photo. Here is how I got it working for Gmail.

As the guide points out, mailers are conceptually similar to controllers. We generate a mailer via the command line:

rails generate mailer UserMailer

This creates a file called app/mailers/user_mailer.rb. More on this file later.

In our project, the user enters an email address via a form. In the code below, the form_tag directs to the users/create action - the create method in the User controller - and the e-mail field passes an :email_address to the params. And since we want to send the user a photo URL, we pass the photo URL as a hidden field:

<%= form_tag("users/create", method: "get") do %>
<img src="<%=@picture_chosen.photo_url%>">
<div>
    <%= hidden_field_tag(:photo_url, @picture_chosen.photo_url) %>
    <%= email_field(:user, :email_address) %>
    <%= submit_tag("Submit")%>
<% end %>
</div>

On submit, the data passes to the User controller’s create method:

class UsersController < ApplicationController

    def create
        @user = User.new(user_params)
        respond_to do |format|
            @user.email_address = params[:user][:email_address]
          @user.photo_url = params[:photo_url]
          if @user.save
            UserMailer.result_email(@user).deliver_now
            format.html { redirect_to(root_path, notice: 'Favorite photo chosen') }
            format.json { render json: root_path, status: :created, location: @user }
          else
            format.html { render action: 'new' }
            format.json { render json: @user.errors, status: :unprocessable_entity }
          end
        end
      end

    private

    def user_params
        params.require(:user).permit(user: [:email_address, :photo_url] )
    end

    end

The email address gets saved as @user.email_address, which we must add to the permitted user params. Upon @user.save, we get directed to:

UserMailer.result_email(@user).deliver_now

UserMailer is the mailer we created at the beginning via rails generate mailer UserMailer. (The deliver_now at the end sends the email immediately; there is also an option for deliver_later.)

So we’re directed to the UserMailer, and we need to put the following code in there:

class UserMailer < ApplicationMailer
    def result_email(user)
        @user = user
        @url  = user.photo_url
    mail(to: @user.email_address, subject: 'Your favorite photo')
    end
end

We’re setting the individual user and the photo URL as objects so we can pass them, and the mail command specifies the email address and the email subject.

The UserMailer inherits from ApplicationMailer, which, like UserMailer, lives in the app/mailers/ folder. ApplicationMailer needs to contain the email address from which the email will be sent:

    class ApplicationMailer < ActionMailer::Base
      default from: "email_sender@gmail.com"
      layout 'mailer'
    end

(Replace “email_sender” with the actual sending account.)

To go along with the UserMailer, there is a corresponding user_mailer folder under app/views/. The user_mailer folder contains two files, result_email.html.erb and result_email.text.erb. The former sends an HTML-formatted email; the latter contains a text-formatted email, which will be sent if the user’s email client doesn’t accept HTML-formatted email.

Here’s our HTML-formatted email in our result_email.html.erb file:

<!DOCTYPE html>
<html>
  <head>
    <meta content='text/html; charset=UTF-8' http-equiv='Content-Type' />
  </head>
  <body>
    <h1>Hello!</h1>
    <p>
      Thanks for picking your favorite photo! Here is a link to the photo you chose as your favorite:
    </p>
    <p>
      <%= @url %>
    </p>
  </body>
</html>

Note that since we created a @url object in the UserMailer, we can call it in the email above.

This sets everything up, but the email won’t actually get sent unless we add the following code to the three files under config/environments/ – development.rb, production.rb, and test.rb:

    config.action_mailer.default_url_options = { host: 'localhost', port: 3000 }
    config.action_mailer.delivery_method = :smtp
    config.action_mailer.raise_delivery_errors = true
    config.action_mailer.smtp_settings =  {
      :address    => "smtp.gmail.com",
      :port       => 587,
      :domain     => 'localhost',
      :user_name  => ENV["gmail_username"],
      :password   => ENV["gmail_password"],
      :authentication   => :login,
      :enable_starttls_auto   => true
      }

This works for Gmail. Other email clients will require slightly different settings.

Note that :user_name and :password are ENV keys, because these are the sender’s username and password, and we don’t want the password to be visible to others. We should also install the Figaro gem and require it in the Gemfile. This creates a file called config/application.yml, which gets added to the .gitignore file and will keep the email name and password hidden. Open this file and add the following (replacing the sample user name and password with the real ones):

gmail_username: "emailer_sender@gmail.com"
gmail_password: "123456789"

Make sure “gmail_username” and “gmail_password” are spelled the same in both the config/environments files and the config/application.yml file.

And we’re done. Your application can now send email.
Refactoring Your Code After Adding a Feature

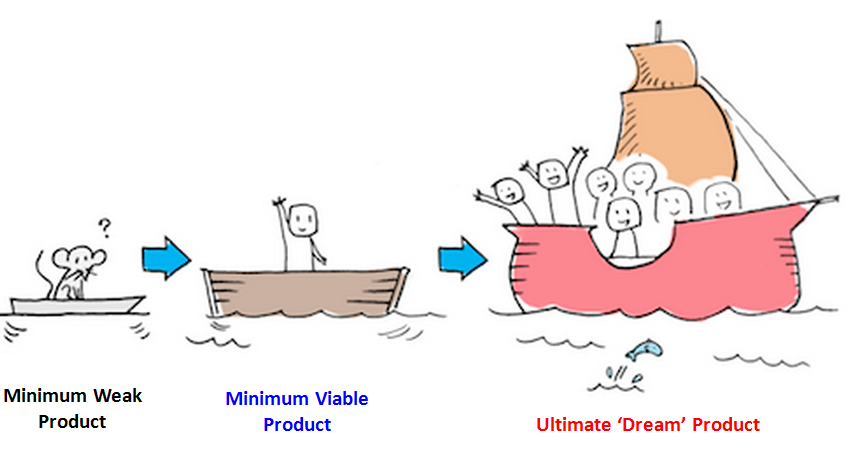
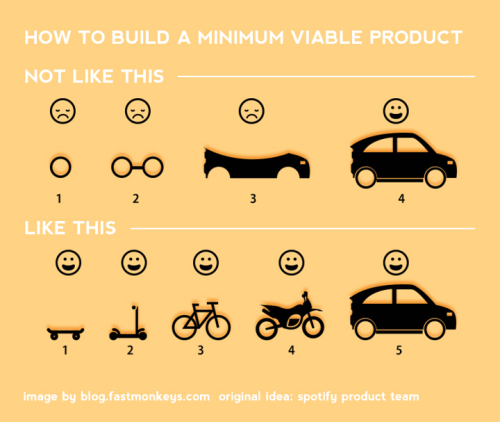
This has been project week at Flatiron, and while designing our websites we’ve been learning to follow the principle of minimum viable product, or MVP. This basically means “the smallest thing you can build that lets you quickly make it around the build/measure/learn loop” or “the smallest thing you can build that delivers customer value (and as a bonus captures some of that value back).”

The idea is to start by building a simple product that works before adding new features. Here’s the image we were shown in class that illustrates MVP:

Our group decided to build a site that maps out public restrooms in New York City so users can easily find a place to answer nature’s call. Users can review existing restrooms and even add restrooms to the site’s database. In creating our site, we found it useful to follow the MVP principle, but this created some issues we had to fix later on.

There’s an existing database of public restrooms in New York City public parks, so we decided that our MVP was to build a map showing all these restrooms. Only after we’d built out this minimum product and had it working would we build the next feature: letting users add restrooms to the database.


credit

When we built out our MVP, we created a table in our database called public_parks. We also had a PublicParks controller, a PublicParks model, PublicParks views, and PublicParks routes. We had a public_park_id as a foreign key in another of our tables, and we had public_parks objects throughout our code. This was all fine when we were working on our MVP, but it created problems when we expanded our project to let users add public restrooms in other types of venues such as restaurants and stores. Each of our parks had a “show” page with the path “/public_parks.” But this URL wouldn’t make sense for a restaurant or bookstore. And anyone looking at our code would be confused by a public parks table that also included stores and restaurants, or public_park objects that weren’t parks. What to do?

We realized we had a couple of options. One, we could create a new table called location types and refactor from there. The other option was just to give the public parks table, files, objects, and routes a new name. Which choice was better?


credit

We realized that, given the features we were planning, there was no need to create a separate table of location types. There was nothing that separated one type of location from another: whether the restroom was in a park, store, or restaurant, our users would be able to rate it on a scale from 1 to 10 and write a review. Therefore, we decided to rename our public parks table, controllers, views, models, and routes as restrooms. Had we wanted to add any features that applied only to stores or restaurants – such as operating hours – it might have made more sense to create separate location types. But since we were creating a fairly simple website, it made more sense to put every location in one table and not differentiate.

But we actually did add a column for location type to our parks table, which gets assigned when a user adds a restroom to the site. The user selects a choice from a dropdown table to categorize the restroom as a park, restaurant, or store. If, in the future, we decide to do different things for these different location types, we have a way to distinguish them without tediously going through all our locations and assigning them location types, one by one.

Depending on your MVP and the features you expect to add later, you’ll have to figure out the best way to structure your code from the start and what you’ll have to do to refactor your code later. As I go through my career and work on more complicated projects, I look forward to learning more about how to plan my code and refactor it. Revising code can be just as fun and challenging as writing it.


credit

Back to the Future With Cron Jobs and Ruby Gems

It’s Back to the Future Day!

Back to the Future is my all-time favorite movie – and the sequels are a close second and third – so this is a pretty special day. To celebrate, I’ll discuss time travel!

Sort of. I’ll discuss cron jobs.

A cron job is a way to schedule tasks ahead of time in Unix-type command-line systems such as the Mac Terminal – for example, sending out an email, updating a file at the same time every day, and so on. Tasks can be scheduled for a particular time or at regular intervals – daily, weekly, etc.

I decided I wanted to post the following tweet on October 21, 2015, at 4:29 pm, to celebrate Marty McFly’s arrival from 1985:

Yes, it's October 21, 2015 at 4:29 pm...

...on the East Coast.

But Hill Valley is in California. Three hours to go.

#BackToTheFuture

I wanted to preschedule my tweet, so it could go out even if I’m away from my computer at the time (as long as my computer is running). First I tried some web apps, but I couldn’t get tweets to appear at the exact time I wanted. So I turned to the command line. Here’s how this works.

Sublime Hints and Shortcuts

I’ve completed my first week as a student in the Flatiron School’s Web Development Immersive program. It’s been exciting and fun and busy and I’ve met friendly, interesting people. It’s the best experience I’ve had in ages.

In this blog post I’ll cover Sublime. Sublime is the default text editor we use at the Flatiron School; we use it to write all our Ruby programs, and I’m using it to write this very blog post. Besides Terminal, it’s probably the program we use most often. Therefore, knowing some Sublime tips and shortcuts can help a programmer become much more efficient. One of our instructors sent us a link to a whole bunch of Sublime shortcuts. I thought I’d cover some of those, and some other tips I’ve found most useful so far: